


このカタログについて
| ドキュメント名 | Technical Note「Residual Protein A Detection Kit」 |
|---|---|
| ドキュメント種別 | ホワイトペーパー |
| ファイルサイズ | 1.8Mb |
| 取り扱い企業 | ザルトリウス・ジャパン株式会社 (この企業の取り扱いカタログ一覧) |
この企業の関連カタログ


このカタログの内容
Page1
Residual Protein A Detection Kit
Residual Protein A Detection Kit
Ready BLI Kit for simple, sensitive, and accurate quantitation
of leached Protein A in bioprocess samples.
Technical Note
-Scop
--- e
What is BLI?
Assay principle and workflow
- Important notes
Assay protocol
- Data analysis
Precision and accuracy
The Residual Protein A Detection Kit is intended for the detection and quantitation of recombinant Protein A or other
Protein A constructs such as MabSelect SuRe™. It has been developed as a simpler, faster alternative to ELISA method
with reduced hands-on time for customers who require a sensitive and robust assay for measuring small amounts of
leached Protein A in antibody or Fc-fusion protein samples. This kit is for research and manufacturing use only and is not
intended for diagnostic use in humans or animals.
Page2
Introduction、What is BLI?
Introduction What is BLI?
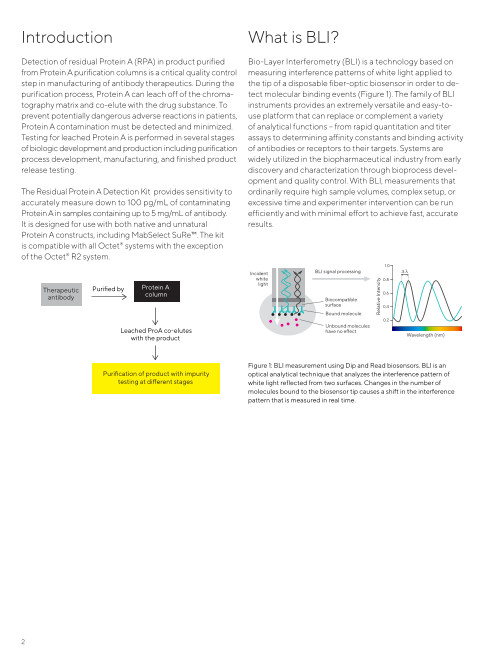
Detection of residual Protein A (RPA) in product purified Bio-Layer Interferometry (BLI) is a technology based on
from Protein A purification columns is a critical quality control measuring interference patterns of white light applied to
step in manufacturing of antibody therapeutics. During the the tip of a disposable fiber-optic biosensor in order to de-
purification process, Protein A can leach off of the chroma- tect molecular binding events (Figure 1). The family of BLI
tography matrix and co-elute with the drug substance. To instruments provides an extremely versatile and easy-to-
prevent potentially dangerous adverse reactions in patients, use platform that can replace or complement a variety
Protein A contamination must be detected and minimized. of analytical functions – from rapid quantitation and titer
Testing for leached Protein A is performed in several stages assays to determining affinity constants and binding activity
of biologic development and production including purification of antibodies or receptors to their targets. Systems are
process development, manufacturing, and finished product widely utilized in the biopharmaceutical industry from early
release testing. discovery and characterization through bioprocess devel-
opment and quality control. With BLI, measurements that
The Residual Protein A Detection Kit provides sensitivity to ordinarily require high sample volumes, complex setup, or
accurately measure down to 100 pg/mL of contaminating excessive time and experimenter intervention can be run
Protein A in samples containing up to 5 mg/mL of antibody. efficiently and with minimal effort to achieve fast, accurate
It is designed for use with both native and unnatural results.
Protein A constructs, including MabSelect SuRe™. The kit
is compatible with all Octet® systems with the exception
of the Octet® R2 system.
1.0
Incident BLI signal processing
white 0.8
Therapeutic Purified by Protein A light
antibody column 0.6
Biocompatible
surface 0.4
Bound molecule
0.2
Unbound molecules
Leached ProA co-elutes have no effect
with the product Wavelength (nm)
Figure 1: BLI measurement using Dip and Read biosensors. BLI is an
Purification of product with impurity optical analytical technique that analyzes the interference pattern of
testing at different stages white light reflected from two surfaces. Changes in the number of
molecules bound to the biosensor tip causes a shift in the interference
pattern that is measured in real time.
2
Relative Intensity
Page3
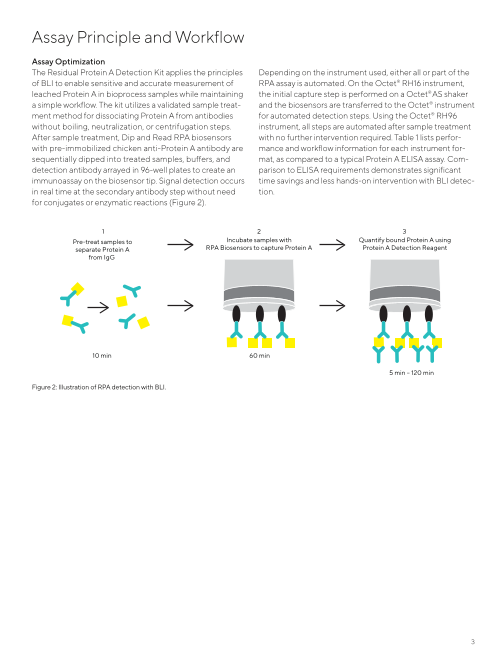
Assay Principle and Workflow
Assay Principle and Workflow
Assay Optimization
The Residual Protein A Detection Kit applies the principles Depending on the instrument used, either all or part of the
of BLI to enable sensitive and accurate measurement of RPA assay is automated. On the Octet® RH16 instrument,
leached Protein A in bioprocess samples while maintaining the initial capture step is performed on a Octet® AS shaker
a simple workflow. The kit utilizes a validated sample treat- and the biosensors are transferred to the Octet® instrument
ment method for dissociating Protein A from antibodies for automated detection steps. Using the Octet® RH96
without boiling, neutralization, or centrifugation steps. instrument, all steps are automated after sample treatment
After sample treatment, Dip and Read RPA biosensors with no further intervention required. Table 1 lists perfor-
with pre-immobilized chicken anti-Protein A antibody are mance and workflow information for each instrument for-
sequentially dipped into treated samples, buffers, and mat, as compared to a typical Protein A ELISA assay. Com-
detection antibody arrayed in 96-well plates to create an parison to ELISA requirements demonstrates significant
immunoassay on the biosensor tip. Signal detection occurs time savings and less hands-on intervention with BLI detec-
in real time at the secondary antibody step without need tion.
for conjugates or enzymatic reactions (Figure 2).
1 2 3
Pre-treat samples to Incubate samples with Quantify bound Protein A using
separate Protein A RPA Biosensors to capture Protein A Protein A Detection Reagent
from IgG
10 min 60 min
5 min – 120 min
Figure 2: Illustration of RPA detection with BLI.
3
Page4
Table 1: Overview of workflow and requirements for Residual Protein A Detection Kit using different Octet® systems.
Octet® Quantitation range (ng/mL) Minimum Assay time per plate Workflow | Throughput
system | assay sample hands-on steps per day
format Protein A MabSelect required Hands-on Octet® Total (plates)
Standard SuRe™ instrument assay time
Octet® RH96 0.1 – 25 0.25 – 25 60 µL 30 min 1 h 11 min < 2 h Sample treatment 7
(96-channel
detection) Place on instrument
Octet® RH96 0.1 – 25 0.1 – 25 60 µL 30 min 2 hs 3 min 2.5 h Sample treatment 5
(16-channel
detection) Place on instrument
Octet® RH16 + 0.1 – 25 0.1 – 25 60 µL 1.5 h (with 36 min 2.25 h Sample treatment 4
Octet® AS intermission)
Octet® AS incubation (1h)
Octet® AS wash
Place on instrument
Octet® R8 + 0.1 – 25 0.1 – 25 130 µL 1.5 h (with 1 h 12 min < 3 h Sample treatment 2-3
Octet® AS intermission)
Octet® AS incubation (1h)
Octet® AS wash
Place on instrument
ELISA Varies by Varies by 50 µL 5 h (with n/a 5 h + O/N Sample treatment 3
manufacturer manufacturer intermission) incubation
Incubation of samples (1h)
4 manual washes
Incubate with antibody
(1h)
4 manual washes
Incubate with conjugate
(30 min)
4 manual washes
Add substrate/
Read plate
4
Page5
M aterials Included、Additional Materials Required、Storage and Stability、Important Procedural Notes forOptimal Performance
Materials Included
- 5.0
1 tray of 96 Residual Protein A (RPA) biosensors
- Pre-immobilized with chicken antibody and preserved
- Protein A
MabSelect SuRe™
Sample Dilution Buffer (2 x 50 mL)
Phosphate buffered saline with detergent, BSA and
preservative
Denaturing Buffer (1 x 20 mL)
0.5
Citrate buffer with detergent and preservative
- (Caution: Acidic)
Detection Diluent – Protein A (1 x 50 mL)
Phosphate buffered saline with PEG, detergent, BSA and
- preservative
Protein A Detection Reagent (1 mg/mL, 1 x 450 μL)
- Chicken antibody in Phosphate buffer with preservative 0.1
Protein A Standard (1 mg/mL, 1 x 100 μL) 0.05 0.5 5 50
Recombinant Protein A in phosphate buffered saline Log (ng/mL)
Figure 3: Comparison of standard curves for provided Protein A Standard
and MabSelect SuRe.™
(Components are not available separately for purchase)
Additional Materials Required Important Procedural Notes for
- Optimal Performance
Octet® system with Octet® BLI Discovery Software
and Octet® Analysis Studio Software software
-- version 9.0 or later 1. Selection of Protein A Standard: The Protein A standard
Octet® AS shaker (not required with Octet® RH96 system) provided in the kit is unconjugated Pierce™ Recombinant
Black polypropylene 96-well, flat bottom microplates Protein A (Thermo Scientific #21184). It functions similarly
(Greiner Bio-One # 655209) to native Protein A and can be used to accurately
quantitate similar recombinant Protein A constructs.
Optional: Black polypropylene 384-well microplates An important exception is MabSelect SuRe™ from GE
(Greiner Bio-One # 781209) Healthcare. MabSelect SuRe™ has significantly modified
Optional: Black polypropylene 384-well Tilted Bottom structure compared to more natural recombinant Protein
microplates (# 18-5080) A constructs, and is recognized differently by Protein A
Optional: MabSelect SuRe™ protein antibodies. These differences can result in quantitation
(GE Healthcare Life Sciences # 28-4018-60) inaccuracies against the included Protein A Standard
(Figure 3).
For accurate quantitation of Protein A in samples purified
Storage and Stability with MabSelect SuRe™, we recommend using uncon-
- jugated MabSelect SuRe™ ligand to generate the standard
Protein A Standard can be stored at 2°C to 8°C for up to curve. MabSelect SuRe™ can be ordered directly from
- 1 month. For longer-term storage, place at -20°C. GE Healthcare Life Sciences, # 28-4018-60.
- All other reagents should be stored at 2°C to 8°C.
RPA biosensors should be stored at room temperature in 2. Assay Interference: Samples with concentrations of
the provided re-sealable bag with desiccant packet away antibody of up to 5 mg/mL can be quantitated accurately
- from direct sunlight. Do not refrigerate or freeze biosensors. using this assay. However, some antibodies can interfere
The kit is stable under recommended storage conditions with Protein A quantitation and lead to inaccuracies. To
until the date printed on the kit and biosensor package. minimize interference, we recommend diluting samples
to antibody concentration of 1 mg/mL or below, keeping
Protein A within the quantitation range of the assay.
Samples should only be diluted in the provided Sample
Dilution Buffer.
5
Log (Binding Rate)
Page6
Assay protocol
Some antibodies or other proteins can interfere with the 6. Overall assay signal will vary from lot to lot. This
assay even at low concentrations. Certain sample matrices variation does not impact results or assay quantitation
can cause interference as well. It is important to test for range. The Binding Rate Separation value on the
assay interference as part of end user validation by one enclosed Certificate of Analysis will indicate approxi-
o- f two methods: mate assay signal range to expect for the associated lot.
Quantitate several 2-fold dilutions of antibody sample
that fall within the Protein A quantitation range of the 7. Do not mix and match kits and biosensor trays. Kit
assay and assess dilution linearity. Interference will reagents are paired with a specific lot of biosensors
- cause non-linearity in quantitation of sample dilutions. to perform optimally. Lot numbers of individual
Use Protein A Standard or MabSelect SuRe™ to per- components of a kit are printed on the Certificate
form a spike-recovery experiment in antibody sample of Analysis.
that contains very low to undetectable levels of Protein
A. Recoveries that are not within 20% of expected 8. Minimum volume required in microplate well for
values indicate assay interference. biosensor dipping is 195 μL in a 96-well microplate or
In most cases protein and/or matrix interference can be 80 μL in a 384-well microplate. These minimum volumes
eliminated by further dilution of the sample in Sample apply for treated samples, buffers and reagents.
Dilution Buffer. For assistance with quantitation in
problematic matrices, please contact Technical Support. 9. Using 384-well Tilted Bottom microplates (# 18-5080)
instead of standard 384-well microplates can reduce
3. Octet® AS Shaker: Use of the Octet® AS shaker is rec- noise and increase sensitivity when running the assay
ommended for this assay as it decreases total assay on the Octet® QK384 system or the Octet® RH96
time and ensures precise measurements. The Octet® AS system in 96-Channel Detection mode. Minimum
is designed to mimic sensor incubation in the Octet® sys- volume required in these plates is 40 μL.
tem at precise shaking speed and temperature. Since
the Protein A quantitation assay has been validated on
the Octet® AS shaker we cannot guarantee assay preci- Assay protocol
sion, accuracy or robustness with other sample incuba-
tion methods. Note that only 96-well plates can be used
on the shaker. Sample pre-treatment
A Octet® AS shaker is not required when running this -- Equilibrate all samples and reagents to room temperature.
assay on the Octet® RH96 system, since all steps can be - Be sure to process all samples identically.
performed on the instrument. Ensure that the Octet® instrument is turned on and
allowed to warm up for at least 1 hour before starting the
4. Re-use of detection reagent: Assay plate wells containing
Detection Reagent at working concentration can be - assay.
Before starting, open the appropriate Residual Protein A
reused in a single experiment for multiple biosensor dips advanced quantitation template in the Octet® BLI
in a 96-well plate. For example, on the Octet® R8 a single Discovery software software. In the Plate Definition tab,
8-well column of Detection Reagent is used to measure define the well location, Sample ID, concentration,
all 96 samples – resulting in 12 biosensor dips per well. dilution factor and replicate group information for each
Over-dipping in Detection Reagent wells can cause data of your standards and samples. This will serve as a map or
a- rtifacts or trending. To maintain accuracy: work list for sample plate preparation.
- Detection reagent in a 96-well plate (200 μL volume)
should not be dipped into more than 12 times.
Detection reagent in a 384-well plate (80 μL volume)
should be dipped into only once.
5. Run a standard curve for each assay. Standards and
samples should be assayed at least in duplicate.
6
Page7
Assay protocol for Octet® R8instrument
1-. Prepare dilutions of standards and samples 3. P
If MabSelect SuRe™ resin was used for purification, use
MabSelect SuRe™ protein as the standard to ensure
- - repare Wash Plate and Detection Plate
Wash plate: Add 200 µL Detection Diluent into each
well of a black, flat-bottom 96-well microplate corre-
accurate results.
All samples and standards should be diluted in Sample
- Dilution Buffer. - sponding to biosensors in the incubating microplate.
Detection plate: Add 200 µL Detection Diluent into
Column 1, wells A through H, of a black, flat-bottom
To cover the entire assay range, suggested concentrations 96-well microplate. Add 200 µL of the diluted Protein
for Protein A Standard curve are 25, 10, 5, 2.5, 1, 0.5, 0.25, A Detection Reagent into Column 2, wells A through
0.1, 0.05, zero ng/mL. Alternatively, prepare initial dilution H, of the same microplate (Figure 4A).
of 20 ng/mL Protein A and perform 2-fold serial dilutions
down to 78 pg/mL. Include a zero ng/mL standard as a 4. W
negative control. - ash the RPA biosensors
- - When Sample Plate incubation is complete, remove
To minimize interference, we recommend diluting the tray of RPA biosensors and the Sample Plate from
samples so that antibody concentration is 1 mg/mL or the shaker.
lower, and Protein A falls within the assay quantitation - Place the Wash plate on the shaker.
range. Lower the tray of RPA biosensors onto the Wash Plate
so that the tips of the biosensors are soaking in the
2. Transfer 130 µL diluted standards and samples to desig- Detection Diluent. Shake for 5 minutes at 30°C at
nated wells of 96-well black, flat-bottom microplate 1000rpm.
(Sample Plate). If using 384-well microplate on the
Octet® RH96 instrument, transfer 60 µL of standards 5. R-- un Detection steps on Octet® R8 instrument
and samples. When the wash is complete, remove the tray of RPA
biosensors and the Wash Plate from the shaker.
3. Pre-treat standards and samples in the 96-well Sample Place the Wash Plate into the blue biosensor tray
Plate by adding 65 µL Denaturing Buffer to each well holder for the RPA biosensor tray, and re-assemble
and mix thoroughly by pipetting up and down gently the tray apparatus by placing the RPA biosensor tray
15–20 times. For 384-well microplate add only 30 µL on top so that the biosensors tips are soaking in the
Denaturing Buffer. - Detection Diluent.
- Place the Detection Plate and the RPA biosensor
4. Incubate on the benchtop for 10 minutes tray assembly in the Octet® instrument in designated
positions.
- In Octet® BLI Discovery Software, open the advanced
Assay protocol for Octet® R8 quantitation template ResidualProteinA_8CH_96W.fmf.
instrument In the Plate Definition tab, define well location, Sample
ID, concentration, dilution factor and replicate group
1. Capture Protein A onto Residual Protein A biosensors information for each of the standards and samples if
u- sing the Octet® AS shaker
- - this was not done previously.
- Place the Sample Plate onto the shaker. Ensure the ‘Delay Start Time’ box is checked in the Run
Lower the green tray of RPA biosensors onto the Experiment tab. The 300 second delay is required to
Sample Plate so that the tips of the biosensors are - enable the Detection Plate to equilibrate to 30°C.
soaking in the samples. Start the run. A full 96-well plate of samples will take
Lock the plate and shake for 1 hour at 30°C with about 75 minutes to complete.
shaking at 1000 rpm.
2. P- repare working-strength Protein A Detection Reagent
Dilute Protein A Detection Reagent 20-fold by adding
90 µL to 1710 µL of Detection Diluent (This volume will
fill one column of a 96-well plate, which is adequate for
measuring 96 samples)
7
Page8
Assay protocol for Octet® RH16instrument
Assay protocol for Octet® RH16
instrument - In the Plate Definition tab, define well location, Sample
ID, concentration, dilution factor and replicate group
information for each of the standards and samples if
1. Capture Protein A onto Residual Protein A biosensors
u- sing the Octet® AS shaker
- -
Place the Sample Plate onto the shaker.
Lower the green tray of RPA biosensors onto the
Sample Plate so that the tips of the biosensors are
- - this was not done previously.
Ensure the ‘Delay Start Time’ box is checked in the Run
Experiment tab. The 300 second delay is required to
enable the Detection Plate to equilibrate to 30°C.
Start the run. A full 96-well plate of samples will take
about 36 minutes to complete.
soaking in the samples.
Lock the plate and shake for 1 hour at 30°C with
shaking at 1000 rpm. A.
2.
P- repare working-strength Protein A Detection Reagent
Dilute Protein A Detection Reagent 20-fold by adding
180 µL to 3420 µL of Detection Diluent. (This volume
will fill two columns of a 96-well plate, which is
adequate for measuring 96 sample wells)
3 .
P- repare Wash Plate and Detection Plate
Wash plate: Add 200 µL Detection Diluent into
each well of a black, flat-bottom 96-well microplate
corresponding to biosensors in the incubating
- microplate.
Detection plate: Add 200 µL Detection Diluent into
Columns 1 and 2, wells A through H, of a black,
flat-bottom 96-well microplate. Add 200 µL of diluted
Protein A Detection Reagent into Columns 3 and 4, B.
wells A through H, of the same microplate (Figure 4B).
4.
W- ash the RPA biosensors
When Sample Plate incubation is complete, remove
the tray of RPA biosensors and the Sample Plate from
- shaker.
- the
Place the Wash Plate on the shaker.
Lower the tray of RPA biosensors onto the Wash Plate
so that the tips of the biosensors are soaking in the
Detection Diluent. Shake for 5 minutes at 30°C at
1000 rpm.
5.
R-- un Detection steps on the Octet® RH16 instrument
After wash is complete, remove the RPA biosensors
and Wash Plate from the shaker. B = Buffer (Detection Diluent)
Place the Wash Plate in the Octet® instrument in D = Detection (Protein A Detection Reagent, working strength)
the biosensor tray position. Position the green Figure 4: Detection plate loading guide for Octet® RH16
RPA Biosensor tray on top of the plate so that the
- biosensors are soaking in the Detection Diluent.
Place the Detection Plate in the instrument in the
Reagent Plate position. Do not place in the other
- plate position!
In Octet® BLI Discovery Software,
open the advanced quantitation template
ResidualProteinA_16CH_96W.fmf.
8
Page9
Assay protocol for Octet® RH96instrument
- In the Plate Definition tab, define well location, Sample Assay protocol for Octet® RH96
ID, concentration, dilution factor and replicate group instrument
information for each of the standards and samples if
- this was not done previously.
- Ensure the ‘Delay Start Time’ box is checked in the Run 1. Select assay format for the Octet® RH96 system. Three
Experiment tab. The 300 second delay is required to possible assay configurations can be run depending on
enable the Detection Plate to equilibrate to 30°C. throughput and sensitivity needs:
Start the run. A full 96-well plate of samples will take
about 36 minutes to complete. a. 9- 6-Channel Detection (Higher Throughput)
- All Protein A standards, samples, and detection
reagents are combined in a single 384-well
A. microplate (Figure 5).
Each step of the assay is performed on 96 biosen-
sors simultaneously, providing the fastest and
- simplest quantitation assay.
B = Buffer (Detection Diluent) Note: Using 96-channel mode for detection results
D = Detection (Protein A Detection Reagent, working strength) in noisier signal than the alternative 16-channel
mode. Expect slightly lowered precision and
Figure 5: Plate loading guide for Octet® RH96 96-Channel Detection
format. All reagents are loaded into a single 384-well plate. reduced sensitivity at the bottom of the assay
quantitation range when using this format.
b. 1-6 -Channel Detection (Higher Sensitivity)
Standards and samples are prepared in one 96-well
plate (Sample Plate), while Detection reagents are
added to a second 96-well plate (Detection Plate)
- (Figure 6A, 6C).
Sample incubation is performed on 96 biosensors
B. simultaneously. Detection steps are performed
on 16 biosensors at a time for greater sensitivity.This
assay configuration takes more time but
provides more precision at the low end of the
quantitation range than 96-Channel Detection
format.
c. 1-6 -Channel Detection, low sample volume
This configuration is identical to 16-Channel
Detection, however a 384-well microplate is used
for the Sample Plate in order to conserve sample
volume. (Figure 6B, 6C)
2. Perform sample pre-treatment. After selecting your
Octet® RH96 assay format, prepare Sample Plate and
B = Buffer (Detection Diluent) perform sample pre-treatment steps as described in the
D = Detection (Protein A Detection Reagent, working strength) “Sample pre-treatment” section.
Figure 4: Detection plate loading guide for Octet® RH16
9
Page10
3. Pre-- hydrate RPA biosensors Sample plate
Add 200 µL Sample Dilution Buffer into each
well of a black, flat-bottom 96-well microplate A.
corresponding to biosensors in the incubating
- microplate (Hydration Plate).
Place the Hydration Plate in the instrument in
the biosensor tray position. Position the green
RPA Biosensor tray on top of the plate so that
- the biosensors are soaking in the buffer.
Pre-hydrate biosensors for a minimum of
10 minutes.
4. Pre-p are working-strength Protein A Detection Reagent
For 96-Channel Detection: Dilute Protein A Detec-
tion Reagent 20-fold by adding 400 µL to 7.6 mL
Detection Diluent. This volume will fill 96 wells of a
- 384-well plate. Sample plate – low sample volume
For 16-Channel Detection: Dilute Protein A Detec-
tion Reagent 20-fold by adding 180 µL to 3420 µL B.
of Detection Diluent. This volume will fill two
columns of a 96-well plate, which is adequate for
measuring 96 sample wells.
5. Pre-p are Detection Plate
For 96-Channel Detection: Add 80 µL treated
samples/standards, Detection Diluent, and working
strength Protein A Detection Reagent into wells of
- a single 384-well plate (Figure 4).
For 16-Channel Detection: Add 200 µL Detection
Diluent into Column 1, wells A through H, of a black,
flat-bottom 96-well microplate. Add 200 µL of the
diluted Protein A Detection Reagent into Column
2, wells A through H, of the same microplate (Figure 5).
Detection Plate
6. -- Place assay plate(s) in the instrument C.
For 96-Channel Detection: Place the combined
Sample/Detection Plate in the instrument in the
Plate 1 position.
For 16-Channel Detection: Place the Sample Plate
in the Plate 1 position. Place the Detection Plate in
the Plate 2 position.
B = Buffer (Detection Diluent)
D = Detection (Protein A Detection Reagent, working strength)
Figure 6: Plate loading guide for Octet® RH96 16-Channel Detection
format. A) Sample Plate (suggested layout) using 96-well plate, B)
Sample Plate (suggested layout) using low sample volume option in
384-well plate, C) Detection Plate layout for both formats
10
Page11
Data analysis、Example data and performancequalification、Example data
7. In Octet® BLI Discovery Software, open the appropriate Example data and performance
adv-a nced quantitation template. qualification
In the Plate Definition tab, define well location,
Sample ID, concentration, dilution factor and The Residual Protein A Detection Kit has been qualified
replicate group information for each of the for performance using standard criteria described below.
standards and samples if this was not done We recommend the user perform their own specific
- previously. qualification and validation to assess kit performance with
Ensure the ‘Delay Start Time’ box is checked in internal samples and specific Protein A construct.
the Run Experiment tab. The 300 second delay is The performance data shown demonstrate the kit’s ability
required to enable the Sample/Detection Plate(s) to detect Protein A in the presence of up to 0.5 mg/ml hIgG
- to equilibrate to 30°C. in Sample Dilution buffer and also determination of preci-
-S tart the run. sion, accuracy, linearity, and sensitivity.
A full plate of 96 samples will take 1 hour 11 minutes
- to complete.
For 16-Channel Detection: A full plate of samples Example data
will take 2 hours 3 minutes to complete.
Standard curve was generated using Protein A Standard
provided in the kit. Samples were run on the Octet® RH96
Data analysis system using 16-Channel Detection. mode. Curve fitting
was performed using weighted 4 parameter logistic model.
1. After the run is complete, open the Octet® BLI Analysis Figure 7 shows sample raw data traces and plotted standard
Software. In the Data Selection tab, load the experimen- curve.
tal folder to be analyzed. Multiple data sets can be
selected at once for analysis. All selected data sets will Protein A Standard curve (n=8)
be analyzed as a group.
25 ng/mL
10 ng/mL
2. In the Results tab, select the appropriate Standard 3.5 5 ng/mL
2.5 ng/mL
Curve Equation. 1 ng/mL
3.0 0.5 ng/mL
0.25 ng/mL
0.1 ng/mL
3. Important: Select ‘R Equilibrium’ as the binding rate 2.5
equation. 2.0
1.5
4. Click the Calculate Binding Rate! Button. This will
determine binding rate equilibrium signal for each 1.0
data trace. Binding rates and calculated results are
0.5
presented in the data table.
0
3900 3950 4000 4050 4100 4150 4200
5. If desired, utilize the Octet® BLI Analysis Software Time (sec)
features to group data or data sets, display individual
graphs, set sample threshold alerts, and view data
statistics. Fitting curve
Standard
6. Click the Save Report button to generate a complete
100
Microsoft® Excel formatted report.
10-1
10-1 100 101
Concentration (ng/ml)
Figure 7: Standard curve made with Protein A Standard included in the kit.
11
Binding (nm) Binding (nm)
Page12
Precision and accuracy
Precision and accuracy Inter-assay precision was determined using 3 different
preparations of sample in 3 independent assays. Protein A
Precision (%CV where %CV = Standard Deviation X 100 / Standard or MabSelect SuRe™ were spiked into Sample Di-
Average) and Accuracy (% Recovery where % Recovery = lution Buffer containing 0.5 mg/mL human IgG. Data
Calculated Conc X 100 / Expected Conc) were calculated shown in Table 3.
for data generated on the Octet® RH96 system using
16-channel detection mode. Table 2 shows results for stan-
dard curves generated with Protein A Standard included in
the kit and with MabSelect SuRe™.
Table 2: Intra-assay precision and accuracy for Protein A Standard and MabSelect SuRe™.
Protein A Standard (included) n = 8 MabSelect SuRe™ n = 8
Target (ng/mL) % CV Recovery Target (ng/mL) % CV Recovery
10 3.6% 105% 10 3.7% 99%
2.5 1.6% 98% 2.5 3.5% 105%
0.5 4.4% 101% 0.5 2.5% 92%
0.1 12.5% 100% 0.1 11.7% 100%
Table 3: Inter Assay precision data for samples containing 0.5 mg/mL human IgG.
Protein A Standard (included) MabSelect SuRe™
No. tests (n=3) Target (ng/mL) % CV No. tests (n=3) Target (ng/mL) % CV
3 5 6.4% 3 5 7.3%
3 2.5 6.6% 3 2.5 7.8%
3 0.5 4.8% 3 0.5 7.0%
12
Page13
Dilution linearity、Sensitivity、Ordering information andtechnical support
Dilution linearity Dilution linearity
Linearity of dilution was established by comparing expect- 100
ed concentration to calculated concentration. The chart
shown in Figure 8 shows excellent correlation of calculated y = 1.0001x + 0.0164
concentrations in the presence of human IgG throughout R2 = 0.99997
the range of the assay. 10
Sensitivity
1
Limit of detection (LOD) is defined as the minimum con-
centration at which an analyte’s presence can be detected
by a given assay, whereas Lower Limit of Quantitation
(LLOQ) is defined as the minimum concentration at which 0.1
0.1 1 10 100
an analyte can be reliably quantified. Here LOD was deter- Expected Protein A (ng/mL)
mined for various assay formats as the concentration corre-
sponding to binding rate signal three standard deviations
above the mean of the zero standard. LLOQ was deter-
mined based on the lowest concentration where recovery is
within 20% of the expected/theoretical value and precision
(%CV) is below 20%. LOD and LLOQ values for both Pro-
tein A Standard and MabSelect SuRe™ can be found in
Table 4.
LOD (ng/mL) LLOQ (ng/mL)
Octet® instrument Protein A Standard MabSelect SuRe™ Protein A Standard MabSelect SuRe™
Octet® RH96 (96-channel detection) 0.07 0.08 0.1 0.25
Octet® RH96 (16-channel detection) 0.03 0.06 0.1 0.1
Octet® RH16 0.03 0.06 0.1 0.1
Octet® R4 0.07 0.08 0.1 0.25
Table 4: LOD and LLOQ values for Protein A Standard and MabSelect SuRe™ for samples containing 0.5 mg/mL human IgG.
Ordering information and
technical support
Part no. UOM Description MabSelect SuRe™ is a trademark of GE Healthcare.
18-5128 Kit Residual Protein A Detection Kit. Contains
1 tray of 96 Residual Protein A biosensors and
reagents for analysis of 96 samples.
13
Tested Protein A (ng/mL)
Page14
Germany USA
Sartorius Lab Instruments GmbH & Co. KG Sartorius Corporation
Otto-Brenner-Strasse 20 565 Johnson Avenue
37079 Goettingen Bohemia, NY 11716
Phone +49 551 308 0 Phone +1 888 OCTET 75
Or +1 650 322 1360
F or further information, visit
www.sartorius.com/octet-support
Specifications subject to change without notice.
Copyright Sartorius Lab Instruments GmbH & Co. KG.
For Research Use Only.
41-0247-TN Rev D